Parse

Adobe AIR native extension
Provides access to the Parse SDK
The extension is available here: com.distriqt.Parse
Documentation
Setup Parse
1. Create Parse Application2. Configuring iOS
Setup the Extension
1. Add the Extension2. Initialise the Extension
Usage
1. Setup ApplicationExternal Links
- ASDocsConfiguring your iOS application for Push
The Parse website has a guide on getting your applicaiton configured correctly in the Apple Developer website, including setting up certificates. This is slightly different from our Push Notifications process but only slightly and mainly in the passwords you need to set on the certificates.
The guide can be found here: https://parse.com/tutorials/ios-push-notifications
Info Additions
You need to add certain Entitlements to your application to be able to use Push Notifications.
<iPhone>
	<InfoAdditions><![CDATA[
		<key>UIDeviceFamily</key>
		<array>
		<string>1</string>
		</array>
		)>
	</InfoAdditions>
	<requestedDisplayResolution>high</requestedDisplayResolution>
	<Entitlements><![CDATA[
		<key>get-task-allow</key>
		<true/>
		<key>aps-environment</key>
		<string>development</string>
		<key>application-identifier</key>
		<string>X5LW23Q6CJ.com.distriqt.test</string>
		<key>keychain-access-groups</key>
		<array>
			<string>X5LW23Q6CJ.*</string>
		</array>
	)></Entitlements>
</iPhone>
These all relate to your application’s entry in the iOS Provisioning Portal.
The first field is the aps-environment. This field indicates whether we are using the
development or the production environment. It must be either development or production
and depends on which configuration you are using. If you are running a debug build you
should use development. If you are looking to publish the application to the AppStore,
you should use production.
If you took note of the applications Bundle Seed ID (App ID Prefix) and Bundle Identifier (App ID Suffix) previously then you can use them here, otherwise see the next section on how to “Acquire the App ID Prefix and Suffix” and return here with that information.
An App ID is the combination of a unique ten character string called the “Bundle Seed ID” and a traditional CF Bundle ID (or Bundle Identifier). The Bundle Seed ID portion of your App ID can be utilized to share keychain access between multiple applications you build with a single App ID. In addition, it can be incorporated into any external hardware accessories you wish to pair your iOS application with. Registration of your App ID is required to utilize the Push Notifications (APNs) and to register an application to incorporate In-App Purchases.
The Bundle Seed ID or App ID Prefix is the first part of the full application ID,
application-identifier, that you must supply in the application descriptor. It should
be of the form of 10 alpha-numeric characters, in our example case its X5LW23Q6CJ.
You should enter this value into the keychain-access-groups field.
The second part of the application-identifier is the Bundle Identifier (App ID Suffix)
and is what we normally consider the AIR application ID.
You should be able to construct the full application ID now and insert it into the
application-identifier field. This is as follows:
[BUNDLE SEED ID].[BUNDLE IDENTIFIER]
Eg:
X5LW23Q6CJ.com.distriqt.test
Acquire the App ID Prefix and Suffix
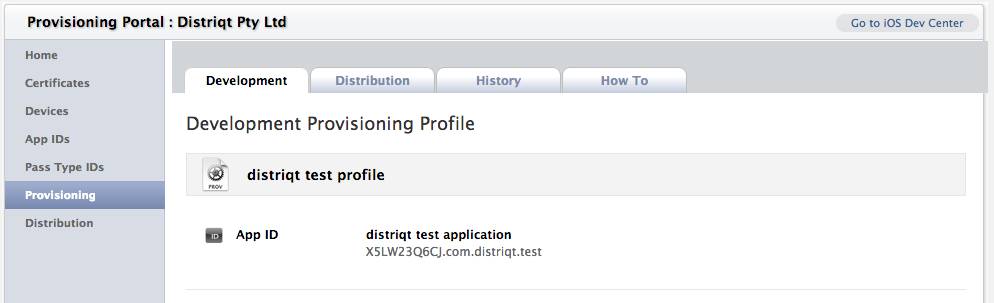
To acquire the Bundle Seed ID and the Bundle Identifiers you need to log into the iOS Provisioning Portal.
Select “Provisioning” from the menu and locate the provisioning profile for your application and click on it. You should be displayed with the following screen, showing the App ID which is of the format:
[BUNDLE SEED ID].[BUNDLE IDENTIFIER]